<a href="http://www.bloglovin.com/blog/11608827/?claim=rusb7mgtpqr">Follow my blog with Bloglovin</a>
Getting ready to work with some great girls for some great giveaways! Can't wait!
Saturday, January 18, 2014
Friday, January 17, 2014
Snowflakes and Lace

As a self taught (and youtube taught) sewer, I haven’t had much experience with knits or lace. I have actually only made 3 things out of knit and one outfit with a pre-cut lace trim. So, when I saw the Snowflakes and Lace tour Sewing Mama RaeAnna is hosting , I thought I would try it out.


This was a really thin knit which was not the easiest to use for me but I LOVE this color. I also grabbed this ivory stretch lace, which I have never used before. I love how it turned out.


I used Sewing Mama RaeAnna’s Cupcake Pattern, I modified it by leaving off the front pocket and cutting the top of the pattern out of lace. I really love how it turned out. Kinley had a great time playing outside in this outfit. I made her a size 3 shirt and I really should have done a 2 with this material but, she loves it sooooo we have some growing room!

Weekend Cutting Table Project

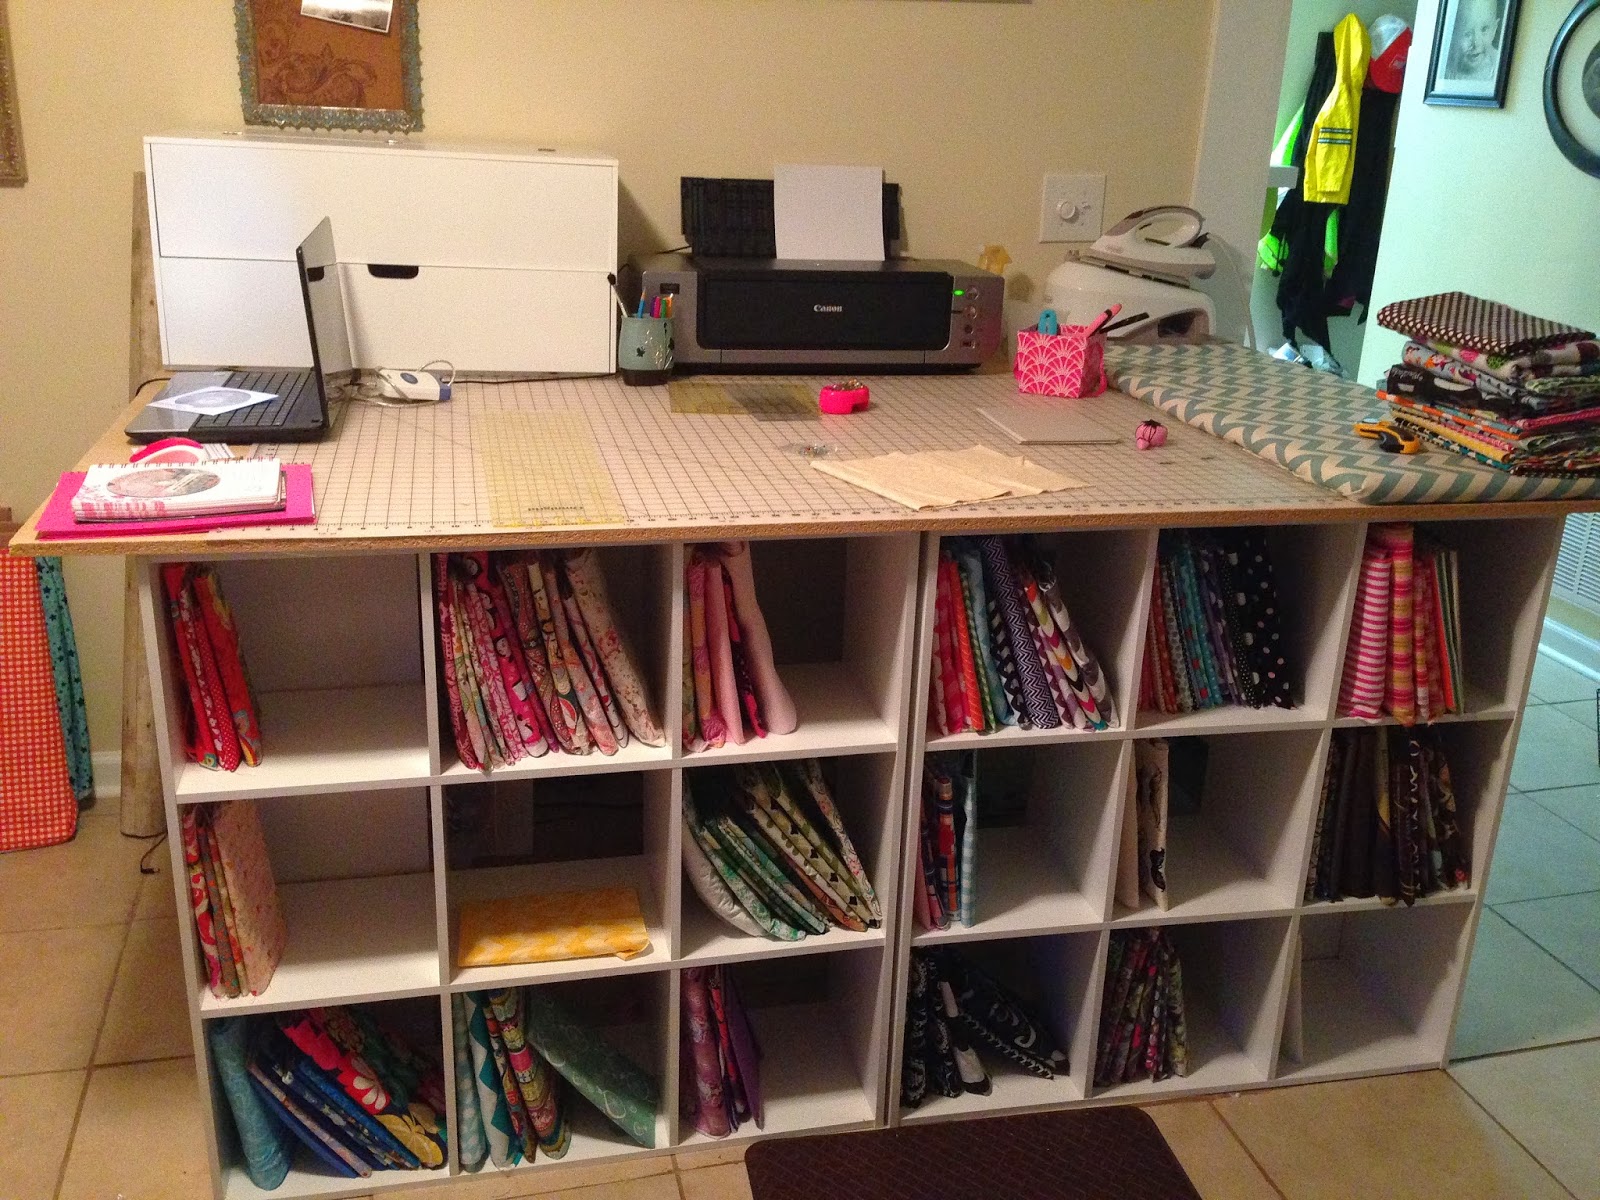
I was inspired by a picture I saw when I typed in counter height sewing table. There were great pictures on google images. The one I saw had 4 cubes one front, two side and one back and just a paper mat on top. I needed something larger. I used two 9 cube organizers on the front and two on the sides. Mine are not attached and don’t line up perfectly like some on line because we have a tiled basement and calling it unlevel would be a giant understatement. On the top is another piece of pressed wood. The white storage box holds my Silhouette Cameo. I made the ironing board out of the left over wood I had cut. I will put that up as a tutorial sometime, maybe later this week....maybe!


Storing scraps has been a constant struggle for me. I have tried bins, baskets, right before this I had gallon plastic bags. I was thrilled to find these fold down front bins at Michael’s for 50% off!!!


I found this great little storage caddy on clearance at Michaels for $19.99. It hold my Silhouette Cameo but will also hold the Cricuts!


Supply List Project Total $295.91
Lowes
Pressed Board 4x5/8x8
I had this cut to 4’ by 80”
$19.99
I saved my scraps and made an ironing board!
Michaels
9 plastic flip down front plastic bins on sale for $5.99 (plus by extra 20% off)
Storage for Silhouette Cameo or Cricut Machines
Close out $19.99
JoAnn’s
Cutting Mat 57x32 $42.00 after my 40% off coupon regular price $69.99
Target
4 9 cube storage shelves $159.96 these were the circo brand on sale for $39.99 each.
does not include tax.
We are moving!
I am so excited, we are moving our website. Please be patient as we transition everything from the old site!
Sunday, January 12, 2014
My Sewing "Studio"

Ok, so really it’s a corner of my basement but Sewing “Studio” sounds way cooler!!! I have already shown how to do the projects so I just thought I would show it all together now. I still have a few things to put away and hang up and I am hoping for a new addition to the sewing counter next month!! And in my dreams I will be adding a 6 needle ;)


Fabric Folding For My Cubes

I feel 100% confident you can find a Way better folding tutorial online, probably youtube. But, I had several people ask me when I posted to the PDF Patterns group. So, here goes. I bought a pure ton of chip board to use for a project and I sent my husband to get it. It was totally not what I thought it was and years later, I finally found a use for it. It is a very light weight chip board, it’s very close to the weight of a cereal box! So, save those cereal boxes if you use them, they can come in handy!The measurements are 9x12. I use my 6” arcrylic cutting ruler and just make one cut in half.


The measurements are 9x12. I use my 6” arcrylic cutting ruler and my paper rotary cutter and just make one cut in half.


Fold selvedge to selvedge and then again.

Keep flipping until you get to the end. I fold anything I can fit round that board a whole time to keep my scrap bins from overflowing! So, they aren’t all perfectly the same height. I also pay some littles to help me so again, they aren’t all perfect (which stretches me) But, I like them to learn to be good workers!


When you get to the end you are going to tuck that last piece in, press it down and stick a pin in the top! Voila done!


Saturday, January 11, 2014
My weekend Project.


These were some of my existing ones. The middle section was my old counter and I had thrown a hollow door on top. It made it just a bit too tall and not quite stable enough for all of the machines.

This is getting all of them put together! It was a late night but I got them all done. I had planned out how I wanted them on paper and stacked them in order. That is how I put them together. I did start with just he square frames and put them in place before I put together drawers. Excuse the random blocks, those were from my “helpers”

This is the front facing view. All drawers are put together and labeled. The top is 5/8 pressed board. I went to get plywood but this was soooo much cheaper and it’s what the drawers were made of anyway, so I decided I would go with that. (I am thrifty)....ok cheap, I am cheap, so when I found this board I was literally doing a happy dance in the isle of Lowe’s. You could totally put a nice plywood or even counter top on here but again, I’m cheap!

The right side has my hoops attached and then the storage is for jewelry making supplies. My daughter hasn’t labeled those yet!

Supply List Project Total $327.33
I am not including tax since all states are different. For my space I needed 21 cubes and 5/8 inch pressed board sheet. I had it cut to 30” x 80”
The cubes are 14.25 x 14.5 x 14.25
Lowes
Pressed Wood Sheet 4x5/8x8. $20.00
Michaels
The cubes were all on sale for 50% off. I think they are on sale until January 24th. I also had a 20% on top of sale price coupon! SCORE!!!
(Prices listed are the sale price)
6-4 drawer organizers @ $19.99
2-3 drawer organizers @ $22.49
1-Multi function cube @ 19.99
2-divided cubes @ $19.99 (I think, they are older)
2-Desk top organizers @ $19.99(the one on the left that holds the copics and the middle front top that looks like it is 9 drawers, it’s really 3 but has 9 spaces)
1-Glass door cube @$22.49 (again, older so guessing here)
2 ribbon holder cubes, these were a close out for $9.99 each.
Subscribe to:
Posts (Atom)